Website Tracking

Thursday, May 25, 2023

Here are 8 Foam Roller Exercises to Flatten Abs


Using a foam roller strengthens your core faster, while burning more calories. The foam roller creates an unstable environment, recruiting additional core stabilizer muscles to keep you balanced during the exercise. The more muscles you recruit, the more calories you burn. Here are 8 foam roller exercises to flatten abs.


Click HERE to Discover these 80 Keto-Friendly and Healthy Slow Cooker Recipes

Are you up for a challenge? Increase the intensity of your workout by incorporating these eight foam roller exercises for abs!

Using a foam roller strengthens your core faster, while burning more calories. The foam roller creates an unstable environment, recruiting additional core stabilizer muscles to keep you balanced during the exercise. The more muscles you recruit, the more calories you burn.

(Watch this video: 6 Ab Workouts That Are Better Than Crunches)

A strong core yields both functional and aesthetic benefits:

  • A strong core allows your body to maintain proper movement patterns during exercise and day-to-day activities. When you are moving efficiently, your risk for injury and/or developing muscle imbalances decreases.
  • A strong core also improves posture. It can both alleviate and decrease your chance of developing lower back pain.
  • The aesthetic benefit of a strong core is one that we all would love to have—a tight and toned tummy that makes you feel confident and proud to show it off!

Core training is an essential component of any fitness plan and should be included in your workout routine two to four times per week.

If you’re just beginning your fitness journey, practice these exercises in a stable environment (i.e., on the floor) first. When you demonstrate proficient control and form in a stable environment, incorporate and master one to two of the foam roller exercises at a time. Aim for two sets of 15-20 reps.

(Read: 20 Reasons for Bloating and How to Get a Flat Belly)

If you’re more advanced, combine five to six of these exercises into a killer circuit-style workout. Try two or three rounds of 10-15 reps per exercise and take up to two minutes of rest between rounds.

Additional tips:

  • To make the exercises more difficult while lying on the foam roller, place your feet closer together on the floor. While completing the exercises, draw in the area on your stomach that is just below your navel.
  • During all other exercises, make a conscious effort to brace your core throughout the movement.

Engaging in both of these tips will increase the number of deep core stabilizers that become activated during the exercises, thus increasing core strength and stability.
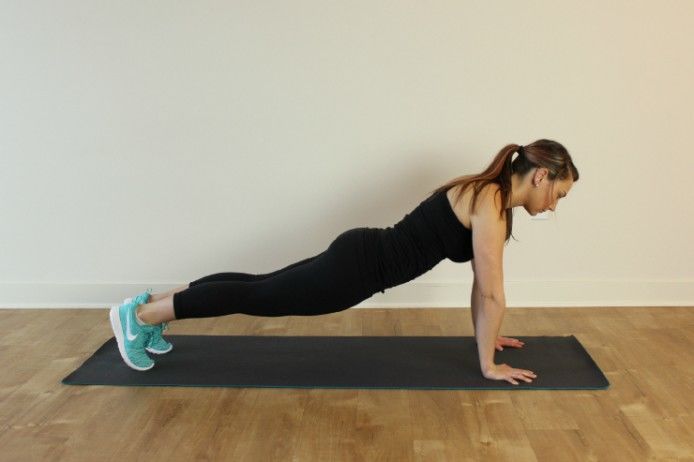
1. Plank

Bend at your elbows and rest your weight on your forearms. Make sure your elbows and your shoulders form a straight line. Adjust the foam roller so that your shins are resting on top, and squeeze your core while keeping your body in a straight line.

Hold this position for as long as you can. The Plank exercise is great for toning the entire core at once.

2. Sit Up with Reach

Lay on the foam roller vertically so it rests between your shoulder blades. Extend your arms in front of you to form a 45-degree angle with the roller. Place your feet on the floor with knees bent and toes pointing straight ahead.

Contracting your abdominal muscles, lift your torso towards your thighs. Lower your torso after it makes a 90-degree angle with your thighs. Repeat for the desired number of reps.
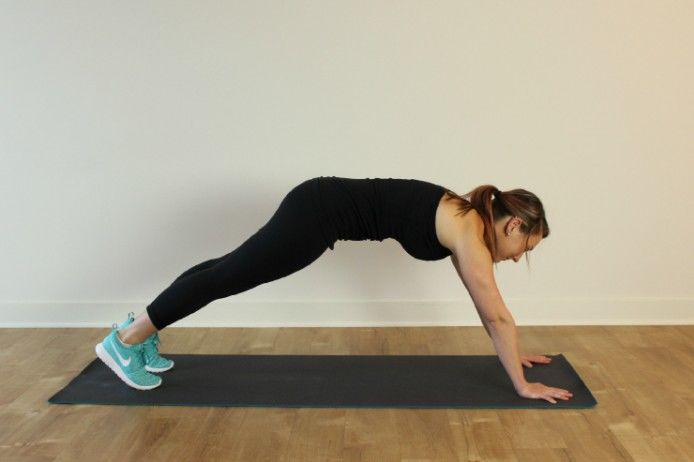
3. Cross Climbers

Place your hands on the floor with fingers pointing straight ahead. Shift your weight onto your hands, keeping your arms fully extended. Your shoulders should form a straight line with your hands. Adjust the roller so that your ankles are resting on it.

Squeeze your abdominals and bring your right thigh towards your stomach, bending at the knee. Return to the starting position and repeat with your left leg. Repeat for the desired number of reps.

4. Leg Pull-In

Sit on the foam roller horizontally so your weight is on your glutes. Shift some of your weight onto your fingers as you place them on the floor behind you, pointing towards the foam roller.

Lift your legs off of the floor and extend them straight ahead. Using your abdominals, pull your legs towards your stomach as you bend at the knees to form a 45-degree angle.

Repeat for the desired number of reps. The Leg Pull-In exercise especially tones the lower abdominal muscles.
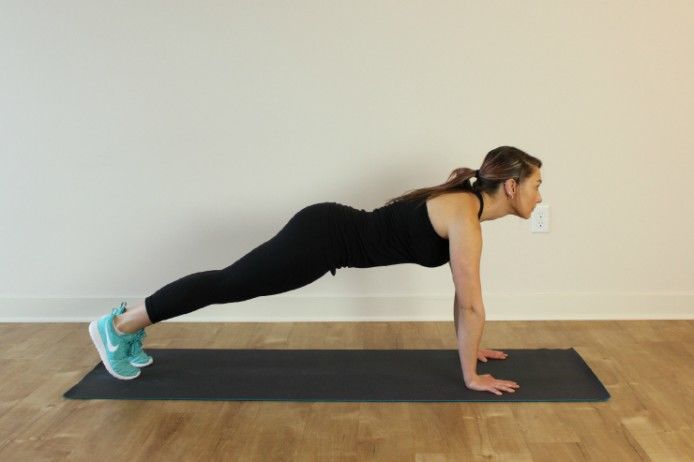
5. Knee Pull-In

Place your hands on the floor with fingers pointing straight ahead. Shift your weight onto your hands, keeping your arms fully extended. Your shoulders should form a straight line with your hands. Adjust the roller so that your upper shins are resting on it.

Using your lower abdominals, pull your knees towards your hands, allowing the foam roller to move along your shins until it is resting below your ankles. Repeat for the desired number of reps.

6. Opposite Hand to Leg

Lay on the foam roller vertically so it rests between your shoulder blades. Extend your left arm behind your head while lifting your right leg off of the floor. Contract your lower abdominals to lift your right leg into the air while contracting your upper abdominals to lift your upper back off of the roller.

Bring your left arm to your right leg and squeeze your abdominal muscles before returning to the starting position.

Repeat for the desired number of reps and then switch to the right arm and left leg.

7. Twist

Sit on the foam roller vertically so it rests between your glutes. Place your feet on the floor with knees bent. Hold a medicine ball, plate, or dumbbell in your hands, keeping it a few inches away from your body.

Pivot your torso by contracting your oblique muscles and shift the weight from side to side. Repeat for the desired number of reps.

8. Side-to-Side

Lay on the foam roller vertically so it rests between your shoulder blades. Place your feet on the floor with knees bent and toes pointing straight ahead. Hold a medicine ball, plate, or dumbbell in your hands and extend your arms fully, creating a 90-degree angle with your torso.

Move the weight from side to side as much as you can while keeping your arms fully extended and your spine firmly on the foam roller.

Repeat for the desired number of reps. The Side-to-Side exercise especially targets the obliques and upper abdominals.

Watch this Video – 8 Foam Roller Exercises to Flatten Abs


Written by Kayla MacArthur

Author Bio:

Both an IAWP Certified Wellness Coach & NASM Certified Personal Trainer, Kayla MacArthur works with women who are experiencing a rocky point in their lives. She helps them find strength both inside and out so that they can be their best self. For daily tips on personal growth, follow Kayla on Instagram.

A lot of people have gotten results from the Keto diet, and enjoyed the foods that it has to offer. However, many of the people who are following this diet have a hard time finding the recipes that they need, especially ones that are quick and easy to complete.

Fortunately, Kelsey Ale, noticed this problem, and decided to do something about it. She’s found that making recipes in a slow cooker gives you meals which are not only delicious, but also take very little time to make. Mostly you just put a few simple ingredients in the slow cooker, and let it do the rest.

To find out more, click on – Keto Slow Cooker Cookbook


Wednesday, May 24, 2023

Here are 18 Workouts to Get Toned Upper Arms


Sometimes doing the same old exercises can get boring, and we know how that can be. So, to spice things up a bit, we’ve created a list of 18 workouts to get toned upper arms.


Click HERE to Discover these 80 Keto-Friendly and Healthy Slow Cooker Recipes

18 Workouts for Strong and Sculpted Shoulders

Want to get toned upper arms? Try these workouts specifically designed for sculpted shoulders!

Sometimes doing the same old exercises can get boring, and we know how that can be. So, to spice things up a bit, we’ve created a list of 18 of the best shoulder exercises to build strength, tone and increase muscle, and increase both flexibility and stability through the shoulder girdle.

Add any of these exercises into your upper body routine to shake up your shoulder workout.

Standard Overhead Press – Stand with feet hip-distance apart and bring your weights and hands up to a goal post position with your palms facing forward and your elbows bent at 90 degrees.

Press the weights overhead without arching your back. Bend at your elbows to bring the elbows back into that 90-degree bend. 

Can be performed with a barbell, dumbbells, kettlebells, and resistance bands.

Neutral-Grip Overhead Press – Stand with feet hip-distance apart and bring your weights up above your shoulders and in front of you with your palms facing each in and your elbows bent at 90 degrees. Press the weights overhead without arching your back.

Bend at your elbows to bring the elbows back into that 90-degree bend. The weights should always be slightly in front of you. Can be performed with a barbell, dumbbells, kettlebells, and resistance bands.

Arnold Press – This combines the neutral-grip and the standard overhead press into one exercise as was one of Arnold Schwarzenegger’s favorite exercises.

Start by standing with feet hip-distance apart, and bring your weights up above your shoulders and in front of you, with your palms towards you and your elbows bent at 90 degrees.

Use your shoulders to open the arms out into a goal post position, then press the arms overhead. Bend at your elbows and reverse the motion to come back down to your starting position, and repeat.

(View this video for a demonstration.) 

Can be performed with dumbbells, kettlebells, and resistance bands.

Front Raise – Stand with feet hip-distance apart, holding dumbbells by your hips and your palms facing you.

Raise your arms up so that they are just about parallel to the floor with palms facing down, and lower back down to repeat.

Relax the neck and make sure to stand in good posture with shoulders pulled back (they may try to creep forward during the exercise!)

Lateral Raise – Stand with your feet hip-distance apart, holding dumbbells by your sides, palms facing in.

Making sure not to use the traps, and pulling your shoulders down, raise your arms out to the side so that your arms are parallel to the floor.

Lower your arms back to your sides and repeat. 

Can be performed with dumbbells, kettlebells, a cable machine, and resistance bands.

Rear Deltoid Raise – Stand with your feet shoulder-width apart and holding your dumbbells with palms facing in. Hinge from your hips and lower your torso down towards the floor so that it is almost parallel to the floor.

With a very slight bend in the elbows, squeeze your shoulder blades together as you raise your arms out to the sides. Slowly and with control, lower the weights back down. Be sure to relax your traps and neck as much as possible.

Upright Row – Start by standing with feet hip-distance apart and holding weights with your palms facing in towards you. Starting from your elbows, pull the weights up to shoulder-height, thinking about squeezing the shoulder blades together in the back.

Your elbows should be in line with your shoulders and think about drawing your shoulders blade down your back to relax the muscles in your neck. Can be completed using dumbbells, a barbell, or resistance bands.

High Pull – Stand with feet hip-distance apart and hold your weight in front of your thighs, bending at your knees and hips so the weights hang just above your knees.

Explosively press your hips forward almost as if jumping and pull the weights up to shoulder level with elbows wide apart, as in an upright row. Can be performed with dumbbells, a barbell, or a kettlebell.

(See a demonstration here.)

Clean and Press – Stand with feet shoulder-width apart and hinge at your hips, keeping your back flat, as you lower down into a deadlift position, grabbing a barbell.

Start with the bar close by your shins, and your elbows pointing out to the side. As you begin to straighten the knees, simultaneously begin to pull the barbell, and press your hips forward, as you shrug and high-pull the bar.

As you extend through your hips, drive the bar up with momentum as your feet should come slightly off the ground. Bring yourself under the bar in a mini-squat, rotating the elbows below the bar, into a racked position across the chest. As you straighten the legs, continue the movement of the bar to press it overhead. Lower back down in the reverse fashion.

(View a full demonstration here.)

Cable Face Pull – Using the double rope handle in the cable machine, and with the pulley positioned at shoulder height, start sanding with arms extended straight in front of you.

Tighten your core as you engage the back of your shoulders to pull the rope towards your face, bringing the elbows just outside the ears. Squeeze the shoulder blades together, and slowly release the arms back straight to repeat.

(See this video for a demonstration.

Internal Rotation – Sit or stand next to a pull cable machine, with the pulley elbow-height. KEEP THE WEIGHT LIGHT, this exercise can do damage to your rotator cuff when too heavy. Position your elbow in by your waistline, with a 90-degree bend in your elbow.

Grab a single-hand cable handle, with your hand facing towards the pulley. This is your starting position. Internally rotate the arm to pull the handle in across your stomach, and then rotate back open.

(Watch a video example here.)

External Rotation – This is the same as the exercise above, only start with the arm reaching across your stomach as you keep your elbow in towards your waistline.

Externally rotate the arm to pull the cable out, away from the cable machine, and control to come back in. Remember to keep the weight light.

(See a video example here.)

Stability Ball Pike – Start in a full plank position with your feet on the stability ball and your shoulders over your hands. Use your abs, especially your lower abs, to lift your hips up to the ceiling, rolling the ball in towards you.

Use your shoulders to stabilize you and keep them directly over your hands the entire time. Slowly lower back down into a plank position and repeat.

Pike Push-Up – Start in a downward-facing dog position, with a wide hand position and your weight shifted more into your hands. Look up at your belly button to keep your neck in line with your spine. Bend the elbows out to the side and lower until the crown of your head just hovers above the ground, then press back up.

Handstand Push-Up – You can start in a handstand with your feet against a wall for support (recommended, if you’ve never done these before). Just as with the pike push-up, lower down by bending the elbows and then press up to straighten the arms.

It’s okay if you can only lower a few inches or so; you can work you way up to full range. If you want to get fancy and are strong enough, you could even do a freestanding handstand push-up (please only attempt this if you can do a handstand and hold it for a period of time).

(See a full demonstration and video here.)

Shoulder Taps – Starting in a full plank position, keep your hips as steady as possible as you reach your RIGHT hand to tap your LEFT shoulder. Place the RIGHT hand back into its starting position, and then tap the LEFT hand to the RIGHT shoulder. Continue alternating as fast as you can without wiggling the hips.

Lateral Plank Walk – Start in a full plank position with your hands directly under your shoulders and feet hip-distance apart. Slightly shift your weight into your left hand and leg as you step your RIGHT hand and foot out about six inches to the right.

Slightly shift over to the right side of your body as you step the LEFT hand and foot to come back underneath you. Continue stepping your hands and feet over to the right for 5-10 “steps,” and then step back to the LEFT.

Inchworm – Start by standing at the end of your mat with your feet hip-distance apart. Bend forward to reach your hands to the mat in a forward fold, reaching your hands flat on the mat (your knees may bend slightly).

Walk your hands out about a foot at a time all the way out into a full plank position. Hold in the plank for a second or two, walk your hands all the way back into the forward fold, and repeat.

Watch this video – Toned Arms Workout | 15 min Upper Body Burn


Written by Deanna Dorman

Author Bio:

Deanna is an ACE® certified personal trainer, Balanced Body® Pilates instructor, and NASM® Fitness Nutrition Specialist. She is passionate about inspiring others to lead a healthier lifestyle through fun workouts and healthy food. When she’s not creating new workouts and recipes for her blog The Live Fit Girls she enjoys running with her two dogs and traveling.

A lot of people have gotten results from the Keto diet, and enjoyed the foods that it has to offer. However, many of the people who are following this diet have a hard time finding the recipes that they need, especially ones that are quick and easy to complete.

Fortunately, Kelsey Ale, noticed this problem, and decided to do something about it. She’s found that making recipes in a slow cooker gives you meals which are not only delicious, but also take very little time to make. Mostly you just put a few simple ingredients in the slow cooker, and let it do the rest.To find out more, click on – Keto Slow Cooker Cookbook


How to Fix the 6 Common Mistakes in Pushup


This isn’t the first time that you’ve heard that pushups are one of the most effective upper body exercises, and it certainly won’t be the last. Today, we’ll not only show you how to do the perfect pushup, but also how to fix the 6 common mistakes in pushup.


Click HERE to Discover these 80 Keto-Friendly and Healthy Slow Cooker Recipes


Mastering the Perfect Pushup (and Common Mistakes to Avoid)

We know. This isn’t the first time that you’ve heard that pushups are one of the most effective upper body exercises, and it certainly won’t be the last. Today, we’ll not only show you how to do the perfect pushup, but also the biggest mistakes to avoid.

Pushups are perfect for those of us that don’t want to pay for a gym membership, travel frequently, or love working out outside. They work every major muscle group in the body, including the legs!

It’s obviously effective for the chest, but did you also know that they help to strengthen back muscles, too? They also work both biceps and triceps, as well as the core.

The only major problem with pushups are these common mistakes, BUT with the directions and a few little technique fixes, you will be able to master pushups once and for all and get a great upper body workout with no equipment at all.

How to do The Perfect Pushup

Get into a Perfect Plank

  • Start on a mat or on the floor on your hands and knees. Place your hands directly under your shoulders, and spread your fingers nice and wide. Be sure to place your weight into your knuckles and fingers, this will take some pressure off of the wrists.
  • With your weight in your fingers, engage your chest muscles by slightly pulling your chest up to the ceiling. The muscles across your shoulder blades should almost feel as if they are pulling away from each other.
  • Once your weight is in your fingers and your chest is engaged, step one foot back at a time, and ground your toes into the floor. You should now be in a full plank position.
  • Engage your abdominals by tilting your pelvis slightly towards your nose. This should tighten your abs, lengthen your lower back, and will help to keep your hips in the correct position.
  • Once your abs are tight, start to engage the muscles in your legs. Tighten your quadriceps, or the front of your thighs, as you squeeze your glutes.
  • Keep your gaze about one foot in front of you, so that the back of your neck stays long and in alignment. Hold here and take a few breaths. By now you should feel every muscle in your body working.

Lower Towards the Floor

  • Now we’re moving! Start to bend your elbows by keeping them close in by your sides. This means they should start to point back towards your feet. By the end of the movement, your elbows should be bent at about 90 degrees.
  • Keep your gaze slightly in front of you as you lower down, making sure not to look too far forward, which would result in cocking the neck.
  • Be sure to keep your abdominals and legs engaged as you lower to keep your torso and legs in one straight line. At the lowest point of your movement, your hips should be at the same height as your shoulders.
  • As you lower, inhale through your nose and focus on drawing your shoulder blades down your back.

Now Pushup

  • Focusing on keeping the weight in your fingers and knuckles, begin to press into your hands to lift your body back up.
  • Exhale as you keep the elbows close in by your sides and you use the muscles in the chest and triceps to straighten the arms back up.
  • Be sure to keep your hips moving up with you as you go. This is an easy place for those hips to sag! Keep the abs extra tight.
  • Repeat your pushups 10-20 times until you can complete 3-4 sets with good form.

Common Mistakes and How to fix them

1. Letting your Hips Sag

Allowing your hips to drop too much can put a lot of excess pressure on your spine and vertebra. Sagging your hips is an indication of not properly activating your core.

How to fix it

Start by engaging your abs and tilting your pelvis towards your nose. This should lengthen your lower back and take away a lot of pressure you might be feeling. Lift your hips slightly so that they are just lower than your shoulders.

2. Hips Too High

Just as easily, you may also face the issue of your hips being too high. This is also a clear sign that your abdominals are not engaged. Because a correct pushup is a full-body exercise, it’s important to make sure you are getting all the benefits throughout the exercise.

How to fix it

Engage your glutes by squeezing your glutes together. This should allow your hips to lower slightly. Try keeping them just about shoulder height at the bottom of your pushup.

3. Arms too Far Forward

A lot of people make the mistake of placing their arms too far in front on them. This is bad for two reasons. First, this can place strain on the elbows and shoulders, and second, it’s extremely inefficient, and will work the chest very little.

How to fix it

Be sure to place the hands directly under the shoulders. Try to perform your pushups next to a floor-length mirror and make sure your arms are straight up and down, like pillars.

4. Flaring Arms out to the Side

If you are doing a standard pushup with your hands directly under your shoulders (not a wide pushup) allowing your elbows to bow out to the side will put a lot of stress on the shoulders.

How to fix it

When lowering into your pushup, keep the elbows in close by sides, and bend the elbows to 90 degrees at the bottom. If this is too challenging for your upper body strength, try practicing a modified pushup on your knees until you work up enough strength.

5. Straining Your Neck

Looking too far in front of your not only puts stress on your cervical spine, but can also inhibit your breathing while performing your pushup.

How to fix it

Be sure to look down while doing your pushups. Before you start, while in your plank position, find a focus point about one foot in front of you. As you lower into your pushup, continue gazing at that point, and then push back up. This will ensure you are not cocking your head during the movement.

6. You Don’t Go Low Enough

Lots of people don’t get enough depth in their pushups to really get full muscle engagement. Many go only halfway, and doing them this way won’t improve your strength like a full pushup would.

How to fix it

When you lower into the pushup, make sure your elbows are bent at at least a 90-degree bend, and your upper arms are parallel to the floor. As you push back up, be sure to fully extend the arms.

Pushup Modifications

These are the two most common modifications, both to regress AND progress your standard pushup. Once you have these down, try these 10 different pushup variations to shake things up!

Regression – Knee Pushups

To find the right position, start in a full plank on your hands, with your hands directly under your shoulders and a straight line from head to feet. Without changing your position at all, just lower your knees to the mat, continuing to keep the straight line from your head to your knees (make sure you are not directly on your knee caps).

Engage your abdominals and lower down, bending the elbows. Focus on pressing through your knuckles to push up, to prevent discomfort in your wrists.

Progression – Single Leg Pushups

Starting in your plank position, engage your abs, and specifically your obliques.

Squeeze your glutes and raise one leg up off the ground. It doesn’t have to be too high, just focus on squeezing your glutes and not shifting your weight too much to the side. Perform your set of pushups with the leg lifted the entire set. On your next set, raise the opposite leg to work both sides evenly.

With these common mistakes corrected, you should be well on your way to strengthening your upper body and can soon start adding other pushup variations into your repertoire.

Watch the Video Here – How to Fix the 6 Common Mistakes in Pushup


Written by Deanna Dorman

Author Bio:

Deanna is an ACE® certified personal trainer, Balanced Body® Pilates instructor, and NASM® Fitness Nutrition Specialist. She is passionate about inspiring others to lead a healthier lifestyle through fun workouts and healthy food. When she’s not creating new workouts and recipes for her blog The Live Fit Girls she enjoys running with her two dogs and traveling.

A lot of people have gotten results from the Keto diet, and enjoyed the foods that it has to offer. However, many of the people who are following this diet have a hard time finding the recipes that they need, especially ones that are quick and easy to complete.

Fortunately, Kelsey Ale, noticed this problem, and decided to do something about it. She’s found that making recipes in a slow cooker gives you meals which are not only delicious, but also take very little time to make. Mostly you just put a few simple ingredients in the slow cooker, and let it do the rest.

To find out more, click on – Keto Slow Cooker Cookbook


Related Posts Plugin for WordPress, Blogger...