Website Tracking

Wednesday, December 28, 2022

Straighten Up – How to Fix Posture Issues in 30 Seconds


Posture is one of the most common buzzwords we hear in the health and wellness world today. However, very few know how to fix posture. Here is how to fix posture issues in 30 seconds.


Click HERE to Discover these 80 Keto-Friendly and Healthy Slow Cooker Recipes


Posture. This is one of the most common buzzwords we hear in the health and wellness world today. However, very few know how to fix posture.

Sitting can be one of the most damaging positions to our health and with more research supporting the importance of good posture, we need to learn how to properly sit.

What you should know:

  • EVERYONE has posture problems. We can all benefit from posture correction.
  • Sitting is one of the most damaging positions for our posture.
  • Poor posture over time can lead to more serious orthopedic problems.

So how do we define posture? In my opinion, posture is essentially a balance between the muscular and skeletal systems that protect the supporting structures of the body.

Without good posture, there is undue stress on the joints, bones, ligaments, and muscles of the body. Posture is a balance between the muscular and skeletal systems.

When we exhibit bad posture, our body relies on some of its passive structures instead of relying on the active structures, i.e., the muscles. The reason this happens is because our muscles are, for lack of a better term, under-recruited.

When they get into poor positions or elongated, they have difficulty working well. The good thing is that our body is pretty good at remodeling if we give it the right feedback.


Incorrect Postures

There are a few common types of posture I typically see most people fall into. Those include: lumbar lordosis, kypholordotic, and forward head. Each of these causes its own unique problems and has treatment methods that can help correct it.

Lumbar Lordosis


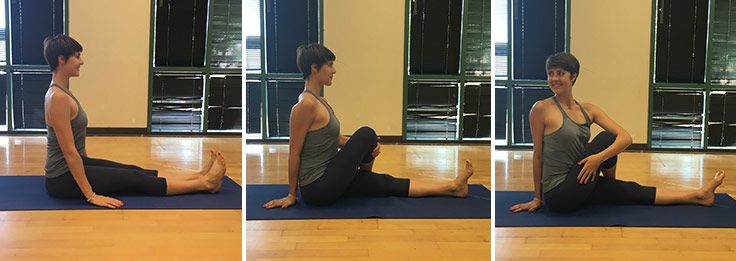
Lumbar lordosis is an exaggerated lumbar curve. It is typically caused by excessive hip flexor tightness and/or poor core control. Over time, this causes increased compressive forces to the facet joints of the lumbar spine and shortening of some of the hip ligaments.

Kypholordotic


This type of posture is caused by shortening of the chest muscles, elongation of the thoracic (middle back) muscles, and thoracic spine stiffness. Additionally, the lower back exhibits similar exaggerated lumbar curve.

Forward Head


Chances are this is a posture most of us exhibit daily. Our head dips forward and our shoulders round forward. Over time this causes shortening of the scalenes, upper traps, suboccipital, and levator scapulae muscles. It can lead to muscle pain, TMJ (jaw) dysfunction, and spinal problems.


What Leads to Poor Posture

Poor posture is often the result of prolonged positions. Think about your daily activities for a moment. Most of us are constantly sitting, texting, or driving.

Additionally, most of us pour our coffee (or tea) with the same arm each day.

Everything from the way you grab your toothbrush to the way you put on a shirt is positionally strengthening your body in those postures. The little things usually won’t affect us. But some of the bigger things, such as sitting and picking up things, can.


Why Poor Sitting Posture Hurts Us

Sitting will inevitably cause us to have poor posture if we do enough of it. Between driving, computer use, texting, and more, we all have to sit more than we would like too. The compression of sitting, rounding of the shoulders, forward head position, and flexion of the hips all lead to imbalances and poor positioning.

Whether we like to admit it or not, most of our postures are really bad while sitting.

What I can tell you is that if you don’t fix posture problems, then you are putting yourself at risk for shoulder, neck, and hip/low back problems in the future. Driving, texting and sitting all contribute to poor posture.

Furthermore, sitting has been shown to affect everything from weight gain to poor breathing patterns. Unfortunately, just exercise alone is not enough to combat the eight-plus hours we sit daily. It must be corrected with both exercise and postural corrections.


Sitting

Sitting in a slouched position with your shoulders rolled forward and head dipped forward is one of the most common postures that causes problems. For example, just having your head dipped forward puts your spine in a C-shaped position.

Our spines are supposed to have certain curvatures to it for proper mobility. Prolonging our spines in a flexed position each day for hours on end can begin to hurt our spine for other positions outside of sitting.

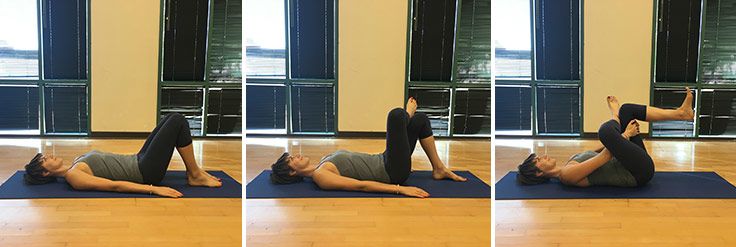
Another frequent problematic area with sitting is our hips. Being in a state of constant flexion can cause our hips to get anteriorly tilted or extended at the lumbar spine. What this does over time is make it tough for our core and glute muscles to respond efficiently.

How to Fix Posture Issues in 30 Seconds

As a physical therapist, I understand that we have to sit throughout our lives. That being said, we don’t have any excuses for not trying to combat some of the sitting we do. So here is how I would recommend you correct your sitting posture.

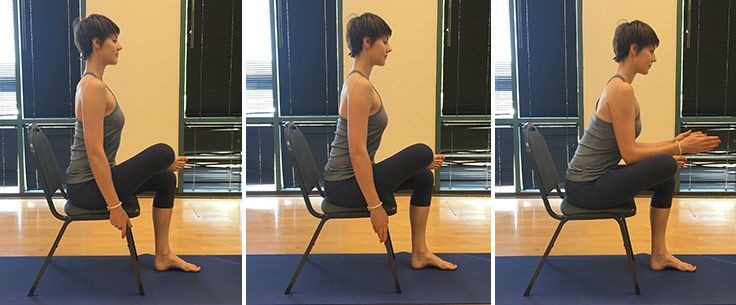
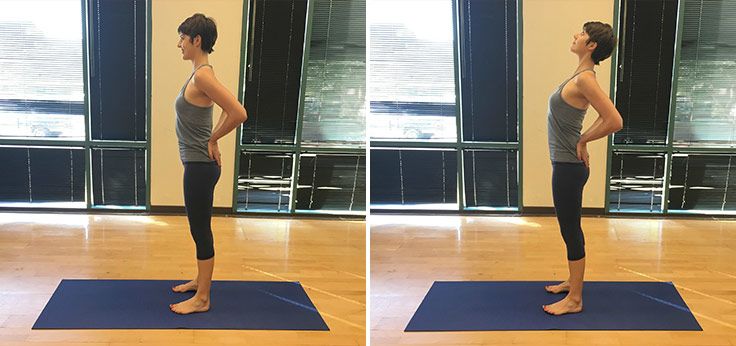
Step 1: Sit straight up.

Step 2: Draw your abdominals in so that your lower back is flat.

Step 3: Pull your rounded shoulders back by slightly pinching your shoulder blades together. Be sure not to shrug up, as this is a very common substitution. One of the best cues is if you draw the top of your shirt up.

Step 4: Perform a chin tuck.


Step 5: Inhale through your diaphragm and out. Do not allow your chest to rise more than your belly.

That’s it! That is a quick fix to your sitting posture to try 1-3x per day to combat some of the damaging effects of sitting. Be sure to stand up as often as possible when you can to further correct your sitting posture!

Watch this Video – How to Reset Your Sitting Posture


Written by Dr. Brian Schwabe

Author Bio:

Dr. Brian Schwabe, PT, DPT, SCS, CSCS is a Board Certified Sports Physical Therapist, Strength Coach, Author, and Fitness Consultant. After Brian concluded his sports physical therapy residency with USC, he went on to achieve board certification in sports physical therapy, placing him in the top 1% of all physical therapists. He believes in blending his unique understanding of mobility, strengthening, and biomechanics to help create a healthier, more active person.

In addition to writing and creating content for PaleoHacks, Brian is the co-founder of The Student Physical Therapist, a popular educational website which teaches people how to keep their bodies healthy, injury free, and out of pain.

He resides in sunny Los Angeles, CA where he enjoys working out, the beach, and healthy living.

A lot of people have gotten results from the Keto diet, and enjoyed the foods that it has to offer. However, many of the people who are following this diet have a hard time finding the recipes that they need, especially ones that are quick and easy to complete.

Fortunately, Kelsey Ale, noticed this problem, and decided to do something about it. She’s found that making recipes in a slow cooker gives you meals which are not only delicious, but also take very little time to make. Mostly you just put a few simple ingredients in the slow cooker, and let it do the rest.To find out more, click on – Keto Slow Cooker Cookbook


Revealing Here the Complete Beginners Guide to Foam Rolling


Foam rolling, or self-myofascial release, is like a deep tissue massage for your muscles. It’s a type of soft-tissue therapy that focuses on connective tissue called fascia. Revealing Here the Complete Beginners Guide to Foam Rolling


Click HERE to Discover these 80 Keto-Friendly and Healthy Slow Cooker Recipes


Foam rolling, or self-myofascial release, is like a deep tissue massage for your muscles. It’s a type of soft-tissue therapy that focuses on connective tissue called fascia.

Fascia is tissue that connects with your muscles, bones, and ligaments to provide support throughout your entire body.

When it works properly, fascia is elastic and can stretch and move as one with the rest of your body. However, many times, due to intense workouts, poor posture or movement patterns, stress, and lifestyle factors, fascia can tighten and become stiff, restricting movement and even causing pain.

Unfortunately, conventional stretching on its own doesn’t always release tight fascia. Direct pressure from a massage therapist, or a tool like a foam roller, or even a lacrosse ball, is needed to release those tight muscles and tissue. It’s important to have muscles and fascia supple and elastic for proper muscle movement and function.

Benefits of Foam Rolling

1. Improves Range of Motion & Performance

Exercise, injury, and lifestyle can cause your fascia to tighten and cause trigger points, or “knots”. These knots are what restrict both mobility and performance.

Foam rolling can break up those knots and return muscles and soft tissue back to normal, increasing range of motion. With an increased range of motion, you can perform better in your workouts by engaging muscles fully to increase strength and power.

2. Relieves Muscle Soreness and Aids in Recovery

Fascia provide your muscles with support and protection. Overuse, injury, and even inactivity can cause fascia to tighten, causing inflammation and irritation.

Foam rolling breaks up those knots which can actually help increase circulation to your muscles and connective tissues. With better circulation and more oxygen, your muscles can recover faster and you’ll experience less muscle soreness.

3. Relaxes Muscles

Just with deep tissue massage, foam rolling applies direct pressure on tight muscles and knots which helps them relax and release tension. “Rolling” over your muscles and trigger points creates a similar effect that a massage therapist uses when kneading your muscles.

4. Lengthens Muscles & Prevents Injury

Just as it increases range of motion, foam rolling allows you to stretch your muscles more efficiently as well. Foam rolling lengthens muscles and breaks down scar tissues that can prevent you from reaching your deepest stretch.

Foam rolling allows muscles to return to their normal length, which in turn allows for proper muscle function. When your muscles are efficiently stretched and function properly there is far less risk of injury.

5. Correct Muscle Imbalances

Because foam rolling can relax tight muscles, improve range of motion, and lengthen muscles, it allows your body to perform better. It helps correct muscle imbalances by relaxing the overactive, tight muscles, and allowing for proper movement to strengthen the weak, underactive muscles.

6. Can Boost your Immune System

A healthy myofascial system directly correlates with a healthy immune system. Your lymphatic system detoxifies your system and keeps it healthy. Lymph, or lymphatic fluid, runs along the facial plane of your body. When the fascia in your body are tight, it restricts the movement of lymph. Foam rolling will release tight fascia, allowing for proper detoxification and immune function.

Fair Warning: Foam Rolling Won’t Feel That Great…

For some, foam rolling seems as if it can’t possibly help if it is so painful while actually doing it. But again, think of it as a deep tissue massage.

Most people understand and know that deep tissue massage can be uncomfortable and even painful. Foam rollers are really just a tool used as a substitute for the hands, elbows and forearms of the massage therapist.

When foam rolling, it is important to choose the right type of roller to start with to minimize the amount of discomfort in the beginning (sometimes the pain the first time can be enough to scare people off forever!). Foam rollers come in different densities, or “hardnesses”.

The harder to roller, the more painful it will be if you have extremely tight muscles and fascia. When starting a foam rolling program, choose a softer roller (usually colored white or light blue) and start there.

As soon as you move off of the foam roller, the muscles you were working on should stop hurting and actually feel relieved and more relaxed. As the discomfort starts to go away when foam rolling, this means that you have been able to work out those knots.

As you progress through a foam rolling program and the pain starts to decrease, you gain flexibility and increase range of motion, and then move up to the next level of hardness in rollers (usually a black roller). Eventually, you will become accustomed to the uncomfortable feeling and even start to enjoy it. You may eventually even want a roller that is lined with a PVC pipe in the middle to really dig into those muscles.

Tips for Foam Rolling

  • Roll each muscle group for 1-2 minutes and roll very SLOWLY. When you hit a tight spot that is painful or uncomfortable, HOLD on that spot for 30-45 seconds. You should feel the tension release slowly.
  • Make sure to keep breathing, even when it’s painful. Holding your breath won’t allow the muscles to release and relax.
  • Be sure to RELAX the muscle as best you can. If you are flexing or tensing the muscle group you are trying to roll out, you won’t feel the trigger points you need to release.
  • Drink plenty of water for the next 24 hours. Your body needs to rid itself of the lactic acid released after rolling.
  • The next day your muscles may be a bit sore. That’s normal, they should feel slightly fatigued and possibly a tiny bit tender. Wait 24-48 hours to foam roll again if you’re sore.
  • Never roll on a joint or bone and DO NOT roll your lower back. Also, when rolling your upper back be careful not to roll directly on your spine, instead always roll one side of your back at a time by slightly leaning to that side. There are small knobs on your vertebrae, called facets, that could get injured when rolling directly on your spine.
  • If an area is too painful to apply direct pressure, shift the roller and apply pressure on the surrounding area and gradually work to loosen the entire area.

Full Body Foam Rolling Routine

Watch this video – The Complete Beginners Guide to Foam Rolling


Here’s a good routine to get you started using your foam roller. Some muscle groups may be more sensitive than others, THOSE are the ones that you need to focus on!

You will eventually be able to feel which muscle groups tend to always be tight for you personally. If you work at a desk (like most people), some areas to pay special attention to are the chest (and fronts of shoulders), lats, hip flexors, and IT-band.

1. Chest

Lay face down with the bottom of the foam roller angled away from you, and your arm extended out to the side over it. (The foam roller should rest in the crease of the front of your shoulder.)

Lift your stomach and hips off the floor to press your weight into the foam roller. Roll forward and backwards a few inches over your chest and your front shoulder muscles. Repeat on the other side.

Watch this video – Foam Rolling Chest


2. Lats

Lie on your RIGHT side with the foam roller just under your armpit and your RIGHT arm extended over the roller. Bring your LEFT leg over and place your foot on the ground for support.

Press all of your weight into the foam roller and roll along the RIGHT side of your torso from your underarm to the bottom of your rib cage, and then roll back up. Repeat on the other side.

Watch this video – Foam Rolling Lats


3. Thoracic Spine

Lay with the foam roller in the middle of your back across your shoulder blades. Clasp your hands behind your head for support, but don’t pull on your neck. Shift slightly to your RIGHT side and lift your hips off the ground to put as much weight as possible up your upper right back. Roll from your shoulder blades down to the bottom of your rib cage and back up. Do NOT roll directly on your spine. Repeat on the other side.

Watch this video – Foam Rolling Thoracic Spine


4. Glutes/Piriformis

Sit on top of the foam roller with your RIGHT ankle crossed over your LEFT knee. Shift your weight to the RIGHT slightly to apply pressure onto your right glute. Roll forward and back slightly to release, then switch sides.

Watch this video – Foam Rolling Glutes/Piriformis


5. Hip Flexors

This can sometimes be a tricky muscle group to reach. The best way to hit it is to angle the upper part of the foam roller away from you so that the bottom part of it lines up with the crease of your pelvis and hips.

Roll back and forth a few inches to release the hip flexors and shift your weight slightly from side to side to hit those muscles a little differently. Repeat on the other side.

Watch this video – Foam Rolling Hip Flexors


6. Quads

Lay facedown, almost in a plank position on your elbows, with the foam roller just under your hips on your quads. Shift as much weight as possible onto the foam roller and slowly roll down your legs to just above the knee and roll back up. Also, try externally rotating your legs to hit the inside quad muscles, and internally rotate your legs to hit the outside quad muscles.

Watch this video – Foam Rolling Quads


7. IT-Band

Lay on your side, with the bottom RIGHT leg placed onto a foam roller between the hip and the knee. Cross your LEFT leg over and place the foot on the floor. Place as much weight as possible into the bottom leg and roll from the hip to just above the knee and back up. Repeat on the other leg.

Watch this video – Foam Rolling IT-Band


8. Calves

Sit on the floor and place the foam roller under your RIGHT lower leg, between the base of your calves and your Achilles. Cross your LEFT leg over your right. Press into your hands and lift your hips off the ground to apply pressure onto the roller.

Slowly walk your hands towards the foam roller to roll it up your leg. Stop just below the knee and roll back down. The most sensitive spot will mostly likely be at the base of your calf muscles. Repeat on the other leg.

Watch this video – Foam Rolling Calves


Watch this video – Foam roller exercises. Full Body Routine


Written by Deanna Dorman

Author Bio:

Deanna is an ACE® certified personal trainer, Balanced Body® Pilates instructor, and NASM® Fitness Nutrition Specialist. She is passionate about inspiring others to lead a healthier lifestyle through fun workouts and healthy food. When she’s not creating new workouts and recipes for her blog The Live Fit Girls she enjoys running with her two dogs and traveling.

When she’s not shooting fitness and nutrition videos, writing workouts, creating recipes, or working with clients, she enjoys long walks on the beach, fun workouts, and spending time with her husband, dog, and baby on-the-way!

A lot of people have gotten results from the Keto diet, and enjoyed the foods that it has to offer. However, many of the people who are following this diet have a hard time finding the recipes that they need, especially ones that are quick and easy to complete.

Fortunately, Kelsey Ale, noticed this problem, and decided to do something about it. She’s found that making recipes in a slow cooker gives you meals which are not only delicious, but also take very little time to make. Mostly you just put a few simple ingredients in the slow cooker, and let it do the rest.

To find out more, click on – Keto Slow Cooker Cookbook


What is Sciatica + Common Causes and How to Fix Sciatica?


Sharp, shooting back pain? Numb legs? Tingling feet? It could be sciatica. Sciatic pain affects more than 3 million people in the U.S . each year. What is Sciatica + Common Causes and How to Fix Sciatica?


Click HERE to Discover these 80 Keto-Friendly and Healthy Slow Cooker Recipes


Sciatica – What It Is, Common Causes, and How to Fix It

Sharp, shooting back pain? Numb legs? Tingling feet? It could be sciatica. Sciatic pain affects more than 3 million people in the U.S . each year. Here’s what to do about it.

Sciatica is a condition characterized by pain in the lower back, leg, and hip due to compression on the sciatic nerve. The sciatic nerve is the largest and longest spinal nerve in the human body. It runs from the lower back down the back of each leg.

Sciatica’s role is to transmit nerve signals between the muscles and skin of the legs and feet (which is basically a fancy way of explaining how the cells communicate with each other).

Pain occurs when something injures, or puts pressure on, the sciatic nerve.

Sciatica is often confused with other ailments, and it’s important to realize that the term actually describes the symptom of nerve compression (i.e., pain), and is not actually the problem itself.

Do You Have Sciatica?

Sciatica is rather common, with over 3 million cases in the U.S. each year. While it can affect any age group, it is most often found in people between the ages of 40 and 60.

However, not everyone who experiences sciatic-like pain is actually suffering from true sciatica. General back pain and piriformis syndrome can also display similar symptoms. Let’s take a look at the differences.

True sciatica: compression of the sciatic nerve at the base of the spine (usually as the result of a herniated disc or bone spur) is the specific cause of true sciatica. This compression causes a radiating pain that affects the lower back, hip, and outer leg.

True sciatica is often diagnosed by the “straight leg raising test,” where a patient lying on their back lifts a straight leg between 30º and 70º. This movement stretches the sciatic nerve and, if no pain occurs, is useful in ruling out the diagnosis of disc herniation.

Piriformis syndrome: is also characterized by pain in the sciatic nerve, but it is not true sciatica because it is not caused by issues related to spinal compression.

Instead, the sciatic nerve is being compressed by spasms of the piriformis muscle – a small muscle located at the side of the buttocks, running from the base of the spine to the top of the thigh bone and directly across the sciatic nerve.

Piriformis syndrome can be hard to identify and is often diagnosed only when true sciatica is ruled out as a cause.

General back pain: will affect up to 85% of Americans at some point during their lives. However, general pain in the back is often not caused by sciatica. In many instances, back pain is caused by overextending or straining the back muscles through exercise, moving heavy objects, or incorrect posture.


Sciatica Symptoms

Both true sciatica and piriformis syndrome display similar symptoms because they are both caused irritation of the sciatic nerve. Although symptoms can show up in both legs, it’s more common for sciatica to only affect one side of the body.

Symptoms include:

  • Mild or severe radiating pain down the leg and into the foot
  • Sharp, shooting pains in the side of the hip, the outer thigh, the calf and/or foot
  • Numbness in the lower extremities
  • Pins and needles in the legs and/or feet
  • A burning sensation in the lower body
  • Muscle weakness in the affected leg
  • Lower back pain (a minor symptom, not nearly as acute as those in the legs and feet)

Common Causes of Sciatica

Herniated Disc: The most common cause of true sciatica is a herniated disc. This occurs when a spinal disc (the “cushions” that lie between each vertebrae in your spine) weakens, and its jelly-like contents are pushed out (i.e., herniated) and press against the root of the sciatic nerve. The pain that stems from this pressure is called sciatica.

Degenerative Spinal Arthritis: Osteoarthritis of the spine breaks down the cartilage on the joints and discs in the neck and lower back. This can produce bone spurs that press against the sciatic nerve, causing intense pain.

Common Causes of Piriformis Syndrome

Pregnancy: During pregnancy, the growing uterus can tighten the piriformis muscle and put pressure on the sciatic nerve.

Overuse: We use the piriformis muscle every day in activities such as walking, exercising, and even sitting in a chair. This means it often gets overworked and becomes overly tight. Imbalanced development in the other leg muscles, such as glutes, hamstrings, and quadriceps, can also lead to the piriformis working harder than it should to pick up the slack.

Incorrect Seated Posture: Sitting with more weight on one hip than the other puts extra pressure on the piriformis and can irritate the sciatic nerve. For men, this may occur when carrying their wallet in their back pocket, and for women when sitting cross-legged in a chair.


Sciatica Treatment

In many cases, sciatica will clear itself up in 4-6 weeks, but specific treatments have been known to help.

Chiropractic Treatments: Spinal manipulation can help to relieve pressure on the sciatic nerve by realigning the spinal column. Combined with ice therapy, ultrasound heat lamps and the use of nerve stimulation devices, chiropractic care has been shown to provide the same amount of pain relief as surgery.

Physical Therapy: Learning specific stretching and strengthening exercises from a physical therapist can help to alleviate symptoms in the short term and reduce the likelihood of sciatica. Studies have shown that physical therapy treatments work just as well as chiropractic care.

The difference is that while chiropractic care relies on manipulation, physical therapy will teach you how to restore flexibility to the back and legs and strengthen the core muscles to stabilize the spine.

Surgery: In some cases, spinal surgery is required to remove the portion of the disc that is pressing on the nerve root. This surgery is primarily performed through a small incision in the back. It’s important to note that 90% of people recover from sciatica without surgery.

Massage: Massage can be used as part of sciatic treatment. However, studies suggest that it is more effective for piriformis syndrome (caused by muscle spasms) rather than true sciatica (caused by spinal compression).

Stretching: Targeted stretches (such as those outlined below) can help ease sciatic pain.

*Please note that these stretches are designed to ease tension from piriformis-induced sciatic pain, and may not be suitable for true sciatica. As with any new exercise, start off slowly with a very gentle stretch. Stop if you have any increase in lower back pain or sciatic pain down your leg. If unsure whether you should perform these stretches, consult your doctor or physical therapist.


7 Stretches for Sciatic Pain Relief

The following five stretches can ease tension in the piriformis muscle, and are best suited to relieve piriformis-induced sciatic pain.

Reclining Pigeon


Start by lying on your back with the knees bent and feet flat on the floor.

Take your left leg and place your ankle across the right knee to make a figure-four shape. While maintaining this leg position, bring your right leg up to a right angle and grasp it with both hands behind the thigh, locking your fingers.

Hold the position for 5-10 breaths before changing legs and repeating the exercise on the other side. You can repeat this exercise up to three times per leg.

Seated Pigeon


Start by sitting on a chair with the left foot flat on the floor and the right ankle on top of the left knee. Keeping a flat back, lean forward and allow your upper body to lean toward your thigh.

To take a deeper stretch, press your forearms against your shins and lengthen the spine even more. Hold for 15 to 30 seconds and then switch sides. You can repeat this exercise up to three times per leg.

Knee to Opposite Shoulder


Start by lying on your back with your legs extended outward and your feet flexed upward. Clasp your hands around your knee and gently pull your right leg across your body toward your left shoulder. Hold it there for 30 seconds and then push your knee so your leg returns to its starting position.

Repeat for a total of 3 repetitions before switching legs. (Note: only pull your knee as far as it will comfortably go. You should feel a comfortable stretch in your muscle, not pain.)

Spinal Twist


Start sitting on the ground with your legs extended straight out in front of you. Bend your right knee and place your foot flat on the floor on the outside of your opposite knee.


Wrap your left arm around the outside of your right knee to help you gently turn your body toward the right. Hold for 30 seconds before releasing. Repeat three times before switching sides (bending the left leg and turning the body to the left).

Standing Hamstring Stretch


Place your right foot on an elevated surface at or below your hip level. Flex your foot so your toes and leg are straight. Hinge your spine forward slightly, leaning your chest towards your foot. Keep your back flat and don’t go so far that you feel pain. Hold for 30 seconds, and then repeat on the other side.


Lumbar Extensions

The following two exercises are generally good for individuals who may have a disc herniation causing sciatica pain.

Prone Press Up


Begin by lying on your stomach with your elbows bent underneath you and palms flat on the surface. Keeping your elbows, hips and pelvis in contact with the surface, lift your head and chest off the mat by pressing down into your arms, keeping your back muscles relaxed. Only go as high as you are comfortable. Hold for five breaths before lowering, and repeat 10 times.

Standing Spinal Extension


Begin by standing with the feet in parallel position and the hands resting on the back of the pelvis, fingers pointing down. Gently press into your hands as you lift your chest towards the ceiling and slightly extend the spine backwards. Hold for five breaths before releasing, and repeat five times.

Watch this video – 3 Safe Exercises For Sciatica Pain Relief


Written by Jennifer Dene

Author Bio:

Jennifer Dene is a celebrity trainer, health coach, and owner of Jennifer Dene Wellness.. She is also the creator of the lifestyle program The Dene Method, and host of the Soulful Self Love Challenge, which helps hundreds of women around the world feel fit, feminine and fabulous.

When she’s not shooting fitness and nutrition videos, writing workouts, creating recipes, or working with clients, she enjoys long walks on the beach, fun workouts, and spending time with her husband, dog, and baby on-the-way!

A lot of people have gotten results from the Keto diet, and enjoyed the foods that it has to offer. However, many of the people who are following this diet have a hard time finding the recipes that they need, especially ones that are quick and easy to complete.

Fortunately, Kelsey Ale, noticed this problem, and decided to do something about it. She’s found that making recipes in a slow cooker gives you meals which are not only delicious, but also take very little time to make. Mostly you just put a few simple ingredients in the slow cooker, and let it do the rest.

To find out more, click on – Keto Slow Cooker Cookbook


Related Posts Plugin for WordPress, Blogger...