Website Tracking

Wednesday, December 28, 2022

What is Sciatica + Common Causes and How to Fix Sciatica?


Sharp, shooting back pain? Numb legs? Tingling feet? It could be sciatica. Sciatic pain affects more than 3 million people in the U.S . each year. What is Sciatica + Common Causes and How to Fix Sciatica?


Click HERE to Discover these 80 Keto-Friendly and Healthy Slow Cooker Recipes


Sciatica – What It Is, Common Causes, and How to Fix It

Sharp, shooting back pain? Numb legs? Tingling feet? It could be sciatica. Sciatic pain affects more than 3 million people in the U.S . each year. Here’s what to do about it.

Sciatica is a condition characterized by pain in the lower back, leg, and hip due to compression on the sciatic nerve. The sciatic nerve is the largest and longest spinal nerve in the human body. It runs from the lower back down the back of each leg.

Sciatica’s role is to transmit nerve signals between the muscles and skin of the legs and feet (which is basically a fancy way of explaining how the cells communicate with each other).

Pain occurs when something injures, or puts pressure on, the sciatic nerve.

Sciatica is often confused with other ailments, and it’s important to realize that the term actually describes the symptom of nerve compression (i.e., pain), and is not actually the problem itself.

Do You Have Sciatica?

Sciatica is rather common, with over 3 million cases in the U.S. each year. While it can affect any age group, it is most often found in people between the ages of 40 and 60.

However, not everyone who experiences sciatic-like pain is actually suffering from true sciatica. General back pain and piriformis syndrome can also display similar symptoms. Let’s take a look at the differences.

True sciatica: compression of the sciatic nerve at the base of the spine (usually as the result of a herniated disc or bone spur) is the specific cause of true sciatica. This compression causes a radiating pain that affects the lower back, hip, and outer leg.

True sciatica is often diagnosed by the “straight leg raising test,” where a patient lying on their back lifts a straight leg between 30º and 70º. This movement stretches the sciatic nerve and, if no pain occurs, is useful in ruling out the diagnosis of disc herniation.

Piriformis syndrome: is also characterized by pain in the sciatic nerve, but it is not true sciatica because it is not caused by issues related to spinal compression.

Instead, the sciatic nerve is being compressed by spasms of the piriformis muscle – a small muscle located at the side of the buttocks, running from the base of the spine to the top of the thigh bone and directly across the sciatic nerve.

Piriformis syndrome can be hard to identify and is often diagnosed only when true sciatica is ruled out as a cause.

General back pain: will affect up to 85% of Americans at some point during their lives. However, general pain in the back is often not caused by sciatica. In many instances, back pain is caused by overextending or straining the back muscles through exercise, moving heavy objects, or incorrect posture.


Sciatica Symptoms

Both true sciatica and piriformis syndrome display similar symptoms because they are both caused irritation of the sciatic nerve. Although symptoms can show up in both legs, it’s more common for sciatica to only affect one side of the body.

Symptoms include:

  • Mild or severe radiating pain down the leg and into the foot
  • Sharp, shooting pains in the side of the hip, the outer thigh, the calf and/or foot
  • Numbness in the lower extremities
  • Pins and needles in the legs and/or feet
  • A burning sensation in the lower body
  • Muscle weakness in the affected leg
  • Lower back pain (a minor symptom, not nearly as acute as those in the legs and feet)

Common Causes of Sciatica

Herniated Disc: The most common cause of true sciatica is a herniated disc. This occurs when a spinal disc (the “cushions” that lie between each vertebrae in your spine) weakens, and its jelly-like contents are pushed out (i.e., herniated) and press against the root of the sciatic nerve. The pain that stems from this pressure is called sciatica.

Degenerative Spinal Arthritis: Osteoarthritis of the spine breaks down the cartilage on the joints and discs in the neck and lower back. This can produce bone spurs that press against the sciatic nerve, causing intense pain.

Common Causes of Piriformis Syndrome

Pregnancy: During pregnancy, the growing uterus can tighten the piriformis muscle and put pressure on the sciatic nerve.

Overuse: We use the piriformis muscle every day in activities such as walking, exercising, and even sitting in a chair. This means it often gets overworked and becomes overly tight. Imbalanced development in the other leg muscles, such as glutes, hamstrings, and quadriceps, can also lead to the piriformis working harder than it should to pick up the slack.

Incorrect Seated Posture: Sitting with more weight on one hip than the other puts extra pressure on the piriformis and can irritate the sciatic nerve. For men, this may occur when carrying their wallet in their back pocket, and for women when sitting cross-legged in a chair.


Sciatica Treatment

In many cases, sciatica will clear itself up in 4-6 weeks, but specific treatments have been known to help.

Chiropractic Treatments: Spinal manipulation can help to relieve pressure on the sciatic nerve by realigning the spinal column. Combined with ice therapy, ultrasound heat lamps and the use of nerve stimulation devices, chiropractic care has been shown to provide the same amount of pain relief as surgery.

Physical Therapy: Learning specific stretching and strengthening exercises from a physical therapist can help to alleviate symptoms in the short term and reduce the likelihood of sciatica. Studies have shown that physical therapy treatments work just as well as chiropractic care.

The difference is that while chiropractic care relies on manipulation, physical therapy will teach you how to restore flexibility to the back and legs and strengthen the core muscles to stabilize the spine.

Surgery: In some cases, spinal surgery is required to remove the portion of the disc that is pressing on the nerve root. This surgery is primarily performed through a small incision in the back. It’s important to note that 90% of people recover from sciatica without surgery.

Massage: Massage can be used as part of sciatic treatment. However, studies suggest that it is more effective for piriformis syndrome (caused by muscle spasms) rather than true sciatica (caused by spinal compression).

Stretching: Targeted stretches (such as those outlined below) can help ease sciatic pain.

*Please note that these stretches are designed to ease tension from piriformis-induced sciatic pain, and may not be suitable for true sciatica. As with any new exercise, start off slowly with a very gentle stretch. Stop if you have any increase in lower back pain or sciatic pain down your leg. If unsure whether you should perform these stretches, consult your doctor or physical therapist.


7 Stretches for Sciatic Pain Relief

The following five stretches can ease tension in the piriformis muscle, and are best suited to relieve piriformis-induced sciatic pain.

Reclining Pigeon


Start by lying on your back with the knees bent and feet flat on the floor.

Take your left leg and place your ankle across the right knee to make a figure-four shape. While maintaining this leg position, bring your right leg up to a right angle and grasp it with both hands behind the thigh, locking your fingers.

Hold the position for 5-10 breaths before changing legs and repeating the exercise on the other side. You can repeat this exercise up to three times per leg.

Seated Pigeon


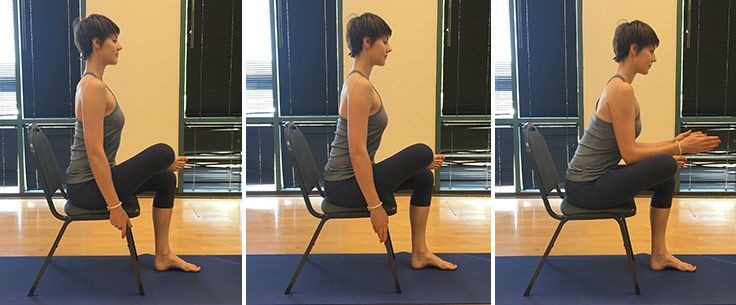
Start by sitting on a chair with the left foot flat on the floor and the right ankle on top of the left knee. Keeping a flat back, lean forward and allow your upper body to lean toward your thigh.

To take a deeper stretch, press your forearms against your shins and lengthen the spine even more. Hold for 15 to 30 seconds and then switch sides. You can repeat this exercise up to three times per leg.

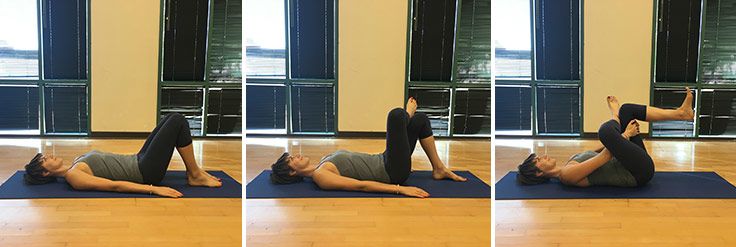
Knee to Opposite Shoulder


Start by lying on your back with your legs extended outward and your feet flexed upward. Clasp your hands around your knee and gently pull your right leg across your body toward your left shoulder. Hold it there for 30 seconds and then push your knee so your leg returns to its starting position.

Repeat for a total of 3 repetitions before switching legs. (Note: only pull your knee as far as it will comfortably go. You should feel a comfortable stretch in your muscle, not pain.)

Spinal Twist


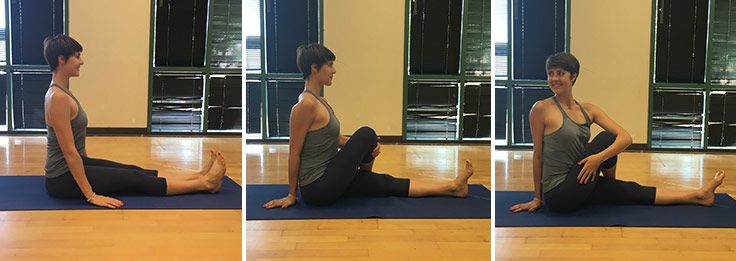
Start sitting on the ground with your legs extended straight out in front of you. Bend your right knee and place your foot flat on the floor on the outside of your opposite knee.


Wrap your left arm around the outside of your right knee to help you gently turn your body toward the right. Hold for 30 seconds before releasing. Repeat three times before switching sides (bending the left leg and turning the body to the left).

Standing Hamstring Stretch


Place your right foot on an elevated surface at or below your hip level. Flex your foot so your toes and leg are straight. Hinge your spine forward slightly, leaning your chest towards your foot. Keep your back flat and don’t go so far that you feel pain. Hold for 30 seconds, and then repeat on the other side.


Lumbar Extensions

The following two exercises are generally good for individuals who may have a disc herniation causing sciatica pain.

Prone Press Up


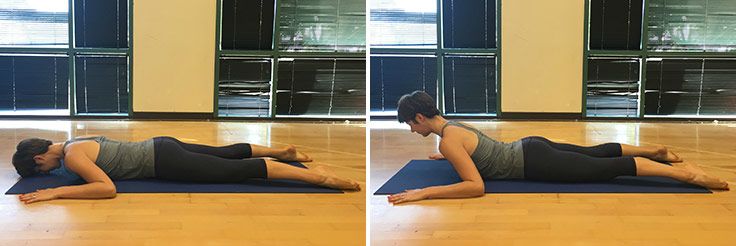
Begin by lying on your stomach with your elbows bent underneath you and palms flat on the surface. Keeping your elbows, hips and pelvis in contact with the surface, lift your head and chest off the mat by pressing down into your arms, keeping your back muscles relaxed. Only go as high as you are comfortable. Hold for five breaths before lowering, and repeat 10 times.

Standing Spinal Extension


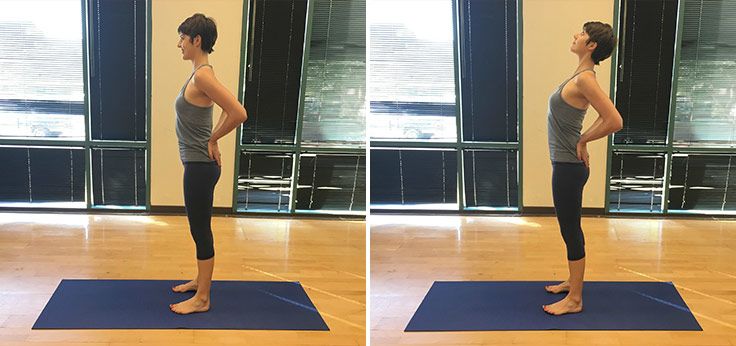
Begin by standing with the feet in parallel position and the hands resting on the back of the pelvis, fingers pointing down. Gently press into your hands as you lift your chest towards the ceiling and slightly extend the spine backwards. Hold for five breaths before releasing, and repeat five times.

Watch this video – 3 Safe Exercises For Sciatica Pain Relief


Written by Jennifer Dene

Author Bio:

Jennifer Dene is a celebrity trainer, health coach, and owner of Jennifer Dene Wellness.. She is also the creator of the lifestyle program The Dene Method, and host of the Soulful Self Love Challenge, which helps hundreds of women around the world feel fit, feminine and fabulous.

When she’s not shooting fitness and nutrition videos, writing workouts, creating recipes, or working with clients, she enjoys long walks on the beach, fun workouts, and spending time with her husband, dog, and baby on-the-way!

A lot of people have gotten results from the Keto diet, and enjoyed the foods that it has to offer. However, many of the people who are following this diet have a hard time finding the recipes that they need, especially ones that are quick and easy to complete.

Fortunately, Kelsey Ale, noticed this problem, and decided to do something about it. She’s found that making recipes in a slow cooker gives you meals which are not only delicious, but also take very little time to make. Mostly you just put a few simple ingredients in the slow cooker, and let it do the rest.

To find out more, click on – Keto Slow Cooker Cookbook


Thursday, December 22, 2022

Here’s 9 Exercises to Relieve Neck and Shoulder Pain


Neck and shoulder pain — now that’s a sure way to put a kink in your day. While knots in any muscle group are frustrating, isolated tension in the shoulders and neck is particularly uncomfortable. Find relief today with these 9 exercises to relieve neck and shoulder pain.


Click HERE to Discover these 80 Keto-Friendly and Healthy Slow Cooker Recipes


Neck and shoulder pain — now that’s a sure way to put a kink in your day.

While knots in any muscle group are frustrating, isolated tension in the shoulders and neck is particularly uncomfortable. Find relief today with these nine exercises to relieve neck and shoulder pain.

The Source of Neck and Shoulder Pain

It’s important to understand that feeling discomfort in the neck or shoulder doesn’t necessarily mean that the source of pain itself stems from that same region. Neck pain could be caused by a shoulder impingement, and pain in the shoulder could be stemming from the neck. In fact, tension in either area could be sparked by an injury or alignment issue in the back of the pelvis, or even from as low down as the ankles.

This is because the entire back side of the body is connected via a thin webbing of connective tissue (fascia), known as the superficial back line. Running from your forehead — up and over the crown of the head, down the length of the spine and the back of the legs — to the bottom of your feet, this fascial line is responsible for extending the body and keeping you in an upright position.

Yet because this fascia is all connected, a dysfunction anywhere in the body along this line could lead to pain in another area. For example, incorrect pelvic positioning can lead to misalignment in the low back, which can continue up the thoracic spine, affecting the position and stability of the shoulder, and ultimately causing neck pain.

The exercises that I am showing you today will improve your neck and shoulder mobility and stability, which should greatly ease pain connected with these regions.

However, if your pain persists, or you’re experiencing sharp-shooting pain in the neck, shoulder or arms, we recommend that you consult with a physical therapist or kinesiologist, who can take a look at your body as a whole.


Common Lifestyle Causes of Neck and Shoulder Pain

Now let’s assume that your current neck and shoulder pain IS actually caused from restriction or instability in the neck and shoulders themselves. Here are three lifestyle factors that could be contributing to your discomfort:

Tech-Neck (Forward Head Posture)

If you’re anything like the average American you could be spending up to eleven hours each day staring at a screen!

Without ergonomics awareness, staring at a computer, smartphone or television screen for hours each day is leading to forward head posture. This causes the neck extensors to stretch, the neck flexors to weaken, and can load an additional 60 pounds of pressure to the back of the neck. Pain aside, forward head posture can also inhibit breathing capacity, lead to migraines and cause brain fog.

Solution: Keep your neck in neutral alignment throughout the day, and take a tech-timeout as often as you can.

Reaching Forward (Rounded Shoulder Posture)

In addition to pulling your neck forward, our chronic use of computers and phones — as well as other lifestyle habits such as driving, cooking, and spin classes — is causing rounded shoulder posture. By living life with your arms primarily in front of you, the chest gets overly tight and the mid and upper back weaken; this instability is a common cause of neck and shoulder pain.

Solution: Skip the chest press for a while and focus on exercises that strengthen the trapezius, rhomboids and latissimus dorsi muscle groups on the back side of the body.

Feeling Stressed

Stress not only causes mental tension, but physical tension as well; as your sympathetic nervous system fires up (getting you ready to fight-or-take-flight), so does your body.

The problem is that this physical response likely occurs when you’re sitting at your desk or in your car, so instead of being able to release the energy from your tightly coiled muscles, the pressure in your body remains, which can lead to neck and shoulder pain.

Solution: Reduce stress by practicing deep breathing exercises throughout the day.

Looking for more stretches to reduce pain? Try these:

Hip stretches: Hip-opening yoga stretches

Lower back pain: 11 Best Lower Back Stretches For Pain & Stiffness

Sciatica: Sciatica: How To Treat Sciatica – Effective Home Exercise Progression For Sciatic Nerve Pain


9 Exercises to Relieve Neck and Shoulder Pain

This sequence is designed to be completed from start to finish; I’ve arranged it into four sections for maximum relief:

Upper back mobility: A flexible upper back places less stress on your neck and shoulders.

Neck mobility: In order to reposition your neck to its optimal neutral alignment, we must first move it gently through a full range of motion.

Shoulder rotations: These exercises are designed to open the chest and shoulder and reverse forward shoulder posture while gently strengthening the muscles that support the mid back.

Alignment: The sequence finishes with two alignment exercises to help you return to an optimal neck and shoulder position

Open Book | 5 reps per side


Start by lying on your side with your knees bent in front of your hips and hands over your ears, elbows pointing forward. Inhale and reach the top elbow to the ceiling, looking up at the elbow point.

Exhale and continue to open the top elbow to the back side until it touches the floor or an elevated prop such as a pillow (to decrease range of motion). Stay for a full inhale and exhale, relaxing your shoulders, inhale again, then exhale and return to the starting position.

Tip: Keep your knees stacked and resting on the floor; move slowly and imagine that you are unwinding the top half of your spine.

Thoracic Extension | 3-5 reps


Start seated on the floor with your mid back resting on a foam roller or a rolled-up bath towel. Support the head in the hands, elbows wide, and keep the feet on the floor. Inhale to prepare.

Exhale and slowly extend your spine back over the roller, only moving as far as you need to until you feel a gentle stretch in the upper back, chest and abdominals. Inhale to hold. Exhale and return to the starting position, using your abdominals.

Tip: Start with a small range of motion and gently increase this over time; you should feel no discomfort in your low back during this exercise.

Head Tilt | 2 min


Start in a comfortable seated or kneeling position, with the head stacked directly above the shoulders and the arms resting by the sides. Inhale to prepare. Exhale and slowly and gently lower the left ear towards the left shoulder, only so far as you need to feel the beginning of the stretch. Inhale to hold. Exhale and return to the top.

Repeat to the left side, pausing on the inhale breath and moving on the exhale. Next, exhale and turn your head to look over the right shoulder. Inhale and return to center. Exhale, look over the left shoulder. Continue to slowly alternate between each position.

Tip: There are many small muscles to stretch between positions A and B. Take your time throughout the movement phase to gently release each muscle.

Neck Roll | 3 circles per side


Start in a comfortable seated or kneeling position, with the head stacked directly above the shoulders and the arms resting by the sides. Inhale to prepare. Exhale and slowly and gently lower the left ear towards the left shoulder, and then take the chin towards the chest.

Inhale as you continue to circle, taking the right ear towards the right shoulder, and finishing by stacking the head above the shoulders in your starting position. Reverse the circle.

Tip: Match the pace of movement to your slow breaths, exploring each position as you transfer through it.

Shoulder Shrug | 10 reps


Start in a comfortable seated or kneeling position, with the head stacked directly above the shoulders and the arms resting by the sides. Inhale and lift the shoulders up towards the ears. Exhale and return them down, feeling the blades settle on the back.

Tip: This move strengthens and releases the muscles in the upper back.

Kneeling Arm Circle | 3-5 reps per arm


Start in a high kneeling position or seated on a chair, with the head stacked directly above the shoulders and the arms resting by the sides, palms facing in and thumb forward. Inhale, reach the left arm straight up to the ceiling, and pause. Exhale, rotate the palm away from your body, and continue to circle the arm until it is back down by the hip, palm facing out and baby finger forward.

Inhale and begin to reverse the circle, stretching the arm behind you and up to the ceiling. Pause. Exhale, rotate the palm back to the body, stretch the arm all the way forward and return it down by your side, palm facing in.

Tip: Really stretch out through your arm as you make this circle, taking up as much space in the room as you can; keep you head, neck and hips relaxed.

Wing Span | 2 min


Start in a high kneeling position or seated on a chair, with the head stacked directly above the shoulders and the arms stretched directly out to the side, in line with the shoulders, palms forward. Inhale to prepare.

For one long exhale: reach the arm up overhead, palm forward; the left arm down by your hip, palm back; bend the elbows and reach the fingers towards each other at the center of your back. Stay for a full inhale and exhale. Inhale again to return to the starting position. Exhale to repeat on the other side. Continue slowly alternating between each position.

Tip: It doesn’t matter if you can’t touch your fingertips, over time you will be able to!

Scapula Slide | 10-15 reps


Start on all fours, wrists under shoulder and knees under hips, with a long flat back. You must press firmly into your palms and fingertips to feel the engagement through your mid back.

Keeping the elbows STRAIGHT, inhale and slide the shoulder blades (scapula) together (you’ll feel as if you’re dropping your chest to the floor). Exhale, press into the hands and return to the starting position.

Tip: You must keep your elbows straight! If this is challenging to do on all fours, stand up and place your hands against the wall to perform the exercise.

Neck Retractions | 6-8 rep


Start by lying on your back, knees bent, arms down by the side and the eyes straight up to the ceiling. Inhale, gently jut the chin forward to the ceiling, keeping the back of the head on the floor. Exhale, retract the chin in towards the throat, and feel the back of the neck lengthen.

Tip: Don’t jut the chin forward too much; it’s a small move. Focus on lengthening the neck against the floor during the retraction phase.

Watch this video – Exercises to Relieve Neck and Shoulder Pain


Written by Jennifer Dene

Author Bio:

Jennifer Dene is a celebrity trainer, health coach, and owner of Jennifer Dene Wellness.. She is also the creator of the lifestyle program The Dene Method, and host of the Soulful Self Love Challenge, which helps hundreds of women around the world feel fit, feminine and fabulous.

When she’s not shooting fitness and nutrition videos, writing workouts, creating recipes, or working with clients, she enjoys long walks on the beach, fun workouts, and spending time with her husband, dog, and baby on-the-way!

A lot of people have gotten results from the Keto diet, and enjoyed the foods that it has to offer. However, many of the people who are following this diet have a hard time finding the recipes that they need, especially ones that are quick and easy to complete.

Fortunately, Kelsey Ale, noticed this problem, and decided to do something about it. She’s found that making recipes in a slow cooker gives you meals which are not only delicious, but also take very little time to make. Mostly you just put a few simple ingredients in the slow cooker, and let it do the rest.

To find out more, click on – Keto Slow Cooker Cookbook


How to Get Relief from Neck and Shoulder Pain?


How to get relief from neck and shoulder pain? DIY Epsom salt compresses for neck and shoulder pain + soothing stretches for neck and shoulder pain


Click HERE to Discover these 80 Keto-Friendly and Healthy Slow Cooker Recipes


DIY Epsom Salt Compress for Neck + Shoulder Pain (Plus: Soothing Stretches)

To get relief from neck and shoulder pain, stiffness, or knots, use this DIY Epsom salt compress coupled with a soothing stretch.

There’s more to using Epsom salts than tossing some in the bath! Here’s how to make your own Epsom salt compress to take your stretching routine to the next level.

But first, let’s go over what Epsom salt is and how it works.

What is Epsom Salt?

Believe it or not, Epsom salt is not actually a salt. It’s derived from the naturally occurring minerals magnesium and sulfate, so its chemical makeup is different from table salt! While regular salt dries the skin and leaves a white residue, Epsom salt is very soothing to the skin and leaves no residue at all.

Epsom salts have been used for centuries in aiding with muscle recovery and healing of minor sprains and bruises. Experts say that the organic magnesium and sulfate found in Epsom salts can be absorbed through the skin to help with muscle and joint recovery.

How is Epsom Salt Used?

Athletes use Epsom salt as a soaking aid for muscle recovery, minor sprains, and bruises, or overall relaxation. It’s mixed with warm water to dissolve and make a soaking solution.

The most common way to use it is by soaking in an Epsom salt bath, but you can also use Epsom salt to make a compress to soothe muscle knots in specific areas.

If you experience any pain in your neck and shoulders, give this Epsom salt compress and upper body stretch a try!


How to Create an Epsom Salt Compress

DIY Epsom Salt Compress

Recipe by Jessica Gouthro

Tools:

  • Large bowl
  • Clean dish towel or hand towel

Ingredients:

  • 2 cups of hot water
  • ¼ cup Epsom salt

Instructions:

  1. Fill a bowl with hot (but not boiling) water.
  • Add the Epsom salt and stir to dissolve.
  • Fold a clean towel into thirds lengthwise.
  • Soak the towel in the Epsom salt water, then wring the towel to squeeze out the excess moisture so that it’s damp, but not dripping.
  • Apply to the affected areas and stretch while relaxing.

Pair Your Compress with These 6 Soothing Neck + Shoulder Stretches

Shoulder Stretch

  • Place the compress on top of your left shoulder.
  • Straighten your left arm and sweep it across your chest.
  • Pull your left elbow towards you with your right hand to feel a stretch across your shoulder.
  • Tilt your head towards the right to lengthen that side of your neck and further stretch that shoulder.
  • Take 5 deep breaths as you hold and enjoy the stretch.
  • Switch the compress to the right and repeat on the other side.

Watch this video- Shoulder Pain Relief Stretches – 5 Minute Real Time Routine


Tricep Stretch

Lift your left arm straight up and bend your elbow to place your hand behind your neck.

Position the compress along the back of your tricep.

Hold onto your left elbow with your right hand and pull it closer to your midline.

Lean slightly towards the right to intensify the stretch.

Take 5 deep breaths as you hold and enjoy the stretch.

Switch the compress to the right and repeat on the other side.

Watch this video – How to Stretch Your Triceps (AND HOW NOT TO!)


Hands Interlocked Behind Back

  • Lay the compress over the top of your shoulders.
  • Interlock your hands behind your back with your thumbs pointing down.
  • Straighten your arms and roll your shoulders back and down.
  • Take 5 deep breaths as you hold and enjoy the stretch.

Watch this video – Chest Stretches With Clasped Hands Behind the Back


Elbows on Back of Chair Stretch

  • Lay the compress over the back of your shoulders.
  • Step behind a chair and place your elbows on the top edge.
  • Bend your elbows and place your palms together behind your head.
  • Lower your head between your arms and press your chest towards the ground.
  • Take 5 deep breaths as you hold and enjoy the stretch.

Watch this video – 3 Simple Stretches Upper to Mid-Back (Thoracic Spine)


Single Arm Back of chair Shoulder Extension

  • Lay the compress over the top of your right shoulder.
  • Turn the chair so it’s facing you.
  • Grab onto the upper right corner of the chair’s back with your right hand.
  • Place your left hand on the seat of the chair for stability.
  • Stretch your right arm straight and look down.
  • Take 5 deep breaths as you hold and enjoy the stretch.
  • Switch the compress to the left and repeat on the other side.

Watch this video – One arm counter shoulder flexion stretch


Side-to-Side Neck Rolls

  • Place the compress around your neck and gently hold the ends with your hands. Do not pull or tug on the towel.
  • Keeping the compress in place, tilt your head to one side, then roll forward and through to the opposite side.
  • Repeat rolling from one side to the other and perhaps even some full circles.
  • Breathe deeply for 5 breaths as you enjoy the stretch and relaxation.

Watch this video – Stiff Neck Relief Exercises by Dr.Berg


If the towel starts to feel dry or has cooled off during any of the stretches, simply re-soak it and wring it out again.

This routine can be used as often as needed to relieve knots or tightness in your neck, arms, and shoulders.

Watch this video – How to Fix Muscle Knots in Your Neck and Shoulder in 30 SECONDS


Written by Jessica Gouthro

Author Bio:

Jessica is a NASM Certified and Prenatal Certified Personal Trainer, Fitness Nutrition Specialist, and co-host of the popular YouTube show Live Lean TV. She has over 12 years of experience in fitness and nutrition coaching, and she has clients all over the world.

When she’s not shooting fitness and nutrition videos, writing workouts, creating recipes, or working with clients, she enjoys long walks on the beach, fun workouts, and spending time with her husband, dog, and baby on-the-way!

A lot of people have gotten results from the Keto diet, and enjoyed the foods that it has to offer. However, many of the people who are following this diet have a hard time finding the recipes that they need, especially ones that are quick and easy to complete.

Fortunately, Kelsey Ale, noticed this problem, and decided to do something about it. She’s found that making recipes in a slow cooker gives you meals which are not only delicious, but also take very little time to make. Mostly you just put a few simple ingredients in the slow cooker, and let it do the rest.

To find out more, click on – Keto Slow Cooker Cookbook


Related Posts Plugin for WordPress, Blogger...